Showing posts with label grade 5. Show all posts

Thursday, March 28, 2024

Matisse meets Haring


In this lesson we combine Keith Haring and Henri Matisse.

Benodigdheden:

  1. white drawing sheet
  2. colored construction paper
  3. black construction paper
  4. scissors
  5. glue
Show some of the later artwork from Matisse (fauvism, 1869-1954), his cut-outs and discuss them. What do you see? What shapes did Matisse use? What are the organic shapes? And the geometric shapes? What's the difference between them? What colors do you see?

Look at the human figures in Keith Harings artwork (popart, 1958-1990). What stands out? How are human beings drawn? Which parts of the body do you see, which parts nog? How do you see that people are moving?

What to do? 

  1. Cut organic and geometric shapes from colored paper.  
  2. Cut a human figure from black paper,  (do not draw first!). Be sure you can clearly see he's moving.  
  3. Arrange the geometric and organic shapes on the white sheet. Overlap is allowed.   
  4. Search for a good place where the human figure fits well and where you can see he's moving, for example because he steps on a geometric shape or dances between the organic shapes. 
  5. Satisfied about your composition? Then glue on all the cut out shapes .

Monday, March 18, 2024

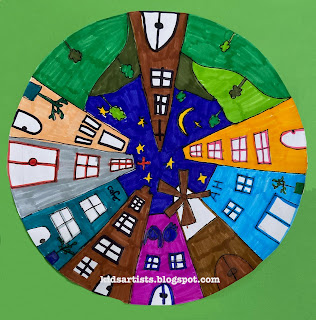
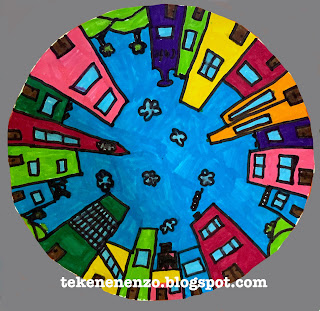
Circle City


You need: 

  1. white drawing sheet
  2. compass
  3. ruler
  4. pencil
  5. markers
  6. colored sheet
  7. glue

Explain the one-point perspective: objects that are further away appear smaller. If we draw a street towards the horizon, it narrows and trees get smaller. 

In one-point perspective you draw all lines parallel to the viewing direction to one point. You literally put a dot on the horizon. 

What to do? 

  • Draw a circle of 20 cm in diameter using the compass. Mark the hole in the center with a dot.  
  • Draw lines form the edges of the circle to the dot in the middle, using ruler and pencil. 
  • Draw buildings in different heights using the lines.  Draw doors and windows. 
  • Color with markers. Outline everything with a fine black marker. 
  • Cut the circle and stick it on a colored sheet. 

Art work made by students of grade 4. 

Friday, March 15, 2024

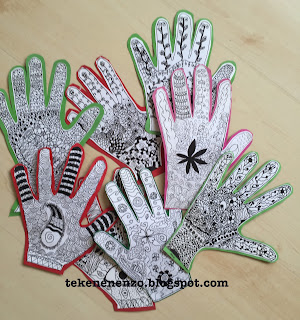
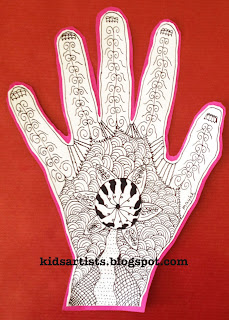
Henna hands

 You need:

  1. white drawing sheet
  2. colored sheet
  3. Indian ink or fine black marker 
  4. glue
  5. scissors 

Henna art is making temporary decorations on the skin using dye from dried henna leaves. Henna decorations are applied during festive occasions in North-African and Asian countries. Used symbols are those of strength, luck, fertility and protection. Patterns and symbols vary per country.  

Trace your hand on a white sheet. Decorate with patterns. Cut oud and stick on a colored sheet. Cut the hand again with an edge of approximately 1/2 cm. 


Thursday, October 26, 2023

Wire portrait like Alexander Calder

made by teacher Wouter 

During a study day on art education our teachers made portraits of wire. This can also be done in higher grades. If you want to make wire figures in lower grades, then choose a simpler shape, for example fruit/veggies or an animal. 

This activity can be done in a lesson about Alexander Calder, known for his wire portraits and mobiles. 

You need:

  1. 3 meters wire thickness 1,3 mm
  2. wire cutter
  3. printed selfie 30 by 40 cm
  4. black marker
  5. painters tape

Take a picture of yourself and print it. 

Outline your face, eyes, nose, mouth and hair using the black marker. Turn the sheet over, the lines can be seen on the back of it now.  

Wrap 3 m of wire around your fingers into a bunch. 

Start at the neck. Lay the wire flat on the photo and follow the lines of your face. Try to lay out the portrait without cutting the wire. If this doesn't work out, you may smuggle by cutting the wire and go on with a new piece. Give the portrait more strength by doubling the wire on some places. Stick the wire now and then on the photo with painters tape. 

Finished? Remove the pieces of tape. Fix the places where wire comes up by making connections with small pieces of wire. See detail photo.  

outline photo with marker

turn over, marker lines have been pushed through

follow the outlines with wire, stick with tape

make stronger

artworks on the table

hang up for beautiful shadows on the wall   

Saturday, October 21, 2023

Painting with scissors like Matisse

made by students of grade 4

You need per student:

  1. 1 sheet white drawing paper
  2. 1 sheet colored construction paper 
  3. 1 sheet colored construction paper from which you cut 7 cm 
  4. 1 sheet blue construction paper 
  5. leftovers of colored paper
  6. glue
  7. scissors
  8. black marker

Who is Matisse?

Matisse (1869 –1954) was a French artist, known for both his use of colour and his fluid and original draughtsmanship. He was primarily known as a painter.

Matisse didn't care if stones were blue, he just chose the colors he liked. Some people thought is art was very ugly: someone who paints blue faces and green noses is a fool and Matisse was called 'Fauve', which means: wild. This is how the word Fauvism came into being for this art movement, art with bold colors. 

After a surgery Matisse spent the rest of his life in a wheelchair. He wasn't able to paint anymore, but could still paint with his scissors.

View various artworks of Matisse. 


Then few the artwork Oasis. What stands out? 

  • no straigh lines 
  • organic shapes
  • bright colors
  • What is an oasis and why is this artwork called so?  
How to make it 

Step 1
Take the two colored sheets: a whole one and one with 7 cm cut off. Paste the smaller sheet on the large one. The strip at the bottom is the table for the fishbowl. 

Step 2
Cut Matisse shapes and glue them on the small sheet. Let them fall of the sheet and cut away the outer pieces.

Step 3
Fold a white sheet in half on the long side and cut out a fishbowl. The center line of the bowl is the fold of the sheet. Trace around the bowl with a thick black marker.   

Step 4
Cut 'water' out of the blue sheet, slightly smaller than the bowl. Paste it in the bowl. Paste the bowl on the colored sheet with organic shapes. 

Step 5
Cut two or three fishes and some water plants and paste them in the bowl.


Elements of art: shape, color. 


Friday, October 20, 2023

One pumpkin, four materials


You need:

  1. drawing sheet
  2. color pencils
  3. watercolor paint
  4. oilpastels
  5. soft pastels
Fold the sheet in four. Draw 4 pumpkins. Color them with different materials. 

Sunday, August 6, 2023

Sail with the VOC

 
by students of grade 6

 You need:

  1. drawing sheet A3 size
  2. drawing sheet A4 size
  3. liquid water color
  4. brush
  5. oil pastel crayons
  6. scissors and glue
  7. ice cream sticks
  8. boxcutter
  9. cutting plate
  10. newspapers 
  11. paper towels
Towards the end of the Golden Age, the Netherlands are at war with England, a battle that is being fought at sea. 
In this lesson students draw a sea ship from that time. 

Study paintings of ships in a battle. What stands out? How do you recognize the Dutch and English ships? Which flags do you see more? What do you see in the foreground of the first painting? What can you tell about the sails? How can you see those ships are in combat? 

Naval battle Anglo-Dutch war(1666). Painter: Abraham Storck

Burning of a part of the English fleet (1667). 
Painter: Pieter van de Velde 

What should you do?
Step 1
First you paint the background on the largest sheet with liquid water color paint. At the bottom (near by) the water is dark, further away it becomes lighter (add water). 

Step 2
Draw on the A4 sheet a VOC-ship with oil pastel and color it. Draw and color extra things which you also see in the water during a naval battle, such as fire,, aa life boat, an anchor etc. Do not forget tho color the sails white!


Step 3
Paint your drawing with blue water color paint. Wipe the excess paint off the white sails with a paper towel. Let dry. 

Step 4
Cut out all parts, leaving a blue edge. Stick ice cream sticks behind the loose parts. Take the large blue painted sheet and decide where you want hour ship and the other things. Cut slices of about 3 cm in this sheet. Insert the sticks into the background and the artwork is done. 

Source: Laatmaarleren.nl 

Saturday, August 5, 2023

Portraits like Rembrandt

You need:

  1. drawing sheets A4 size
  2. charcoal
  3. paper towels
  4. black construction paper for background 
Chiaroscuro is a tecnnique in artworks which display an extreme contrast is between light and dark to create a dramatic effect. 

Titus, son of Rembrandt van Rijn (Rembrandt, 1660)

Narcissus, the man who fell in love with himself, Caravaggio (1597-1599)

Show these two paintings. What do you see? Where are the dark parts, where the light ones? Why is that? What's the artists goal? What do you feel when you see these paintings?

Students sit in pairs facing each other and create a portrait of each other using hatching and swiping techniques. Of course the background is dark, the face light.

by students of grade 4  

Friday, August 4, 2023

Insects

 You need:

  1. crayons
  2. black construction paper 20 by 20 cm
  3. black paint
  4. brush
  5. toothpick
Color a drawing sheet with crayons. Paint the entire sheet black and let it dry.  Scratch insects with a toothpick. 

 Paste the artwork on a coloured background.

Wednesday, August 2, 2023

Dutch canal houses: indian ink and soft pastels


You need: 

  1. drawing sheets
  2. pencil
  3. ruler
  4. indian ink
  5. dip pen
  6. soft pastels
Dutch canal houses are famous for their facades: stepped gable, neck gable, bell gable, clock gable or spout gable. Show pictures of those five gables and discuss them. Show photographs from canal houses and discuss the other features of canal houses: the stairs, symmetry, windows, ornaments, shutters. 
Students draw a line on their sheet about 5 cm from below. This is the canal. At the end you can glue all drawings together to get a long street full of canal houses. Sketch the houses lightly with a grey pencil. Indicate the places of windows, stairs, doors and shutters. Draw small boats in the canal. Draw the houses with indian ink and color them with soft pastels.

by students of grade  6

Wednesday, May 10, 2023

Vincent van Gogh's chair


You need:
  1. for prints: colored paper 14 by 14 cm 
  2. for background: colored paper 
  3. linoleum 12 by 12 cm
  4. carbon paper
  5. lino knife
  6. flat piece of glass 
  7. block printing ink
  8. lino roller
  9. lino press
  10. glue

The painting The chair is from 1888 (The National Gallery, London). View this painting and discuss it using elements of art. What do you see? What stands out? What do you on the chair? What can you say about the perspective? What materials did Van Gogh use? What do you think about the colors? Do you like the painting or not, and why is that?  

Print the drawing below as a picture of 12 by 12 cm. 


Transfer the lines from the image to the linoleum using carbon paper and a pen. 


Cut out the lines.


Make two prints in colors you like. You can mix them too! Let dry. 


Stick the works on a matching colored sheet. 

Elements of art: color, space, line. 

Monday, May 8, 2023

Tropical birds in chalk pastel


You need:

  1. black construction paper
  2. black oil pastels
  3. chalk pastels
  4. fixative spray
View photo's of tropical birds and discuss them. 
Draw on the black sheet a bird on an branch using black oil pastel. Color with chalk pastels and finish it with fixative spray. 


Friday, April 28, 2023

On Monet's bridge


You need: 

  1. drawing sheet A3 size
  2. tempera paint
  3. brushes
  4. white construction paper
  5. scissors
  6. oilpastels
  7. glue
Claude Monet (1840-1926) is considered one of the most important painters of Impressionism. 

 Typical for Impressionists:

  • they choose subjects from ordinary life 
  • special attention for light and color
  • work in the open air
  • smooth brushstrokes
  • dashes resemble a sketch
  • it's about the impression!

Discuss the term impressionism. Show some paintings by Monet and zoom in on a work with water lilies in Arts & Culture. Do students see the characteristics of impressionism in this artwork?

Monet had a large garden with a pond and a Japanese bridge in Giverny France. He liked to paint in that garden. His works of water lilies are therefore famous and are the basis of this lesson.


Lesson 1
Draw a horizon line above the middle of your sheet. Paint the pond and the sky with short brush strokes, like Monet did. Do not mix the paint, but take two colors on your brush.  Make sure the blue color of the pond is not the same color as the sky.
Paint trees on both sides of the sheet in the same way. Paint water lilies in the pond. Be sure that they are larger in the front of the pond than in the back.  


Lesson 2
Have someone take a picture of you that shows you all the way. Print the photo and cut it out. 
Cut three parallel arcs from about 1,5 cm wide from the construction paper.  Then cut four straight pieces of 1,5 cm wide. Paste the photo on the work and paste the bridge over it. 


All artworks are made by students of grade 6

Source: MaryMaking.blogspot.com

Tuesday, April 25, 2023

Van Gogh's bedroom

        by a student of grade 6 

You need:
  1. for prints: black and white sheets 18 by 14 cm 
  2. for background: black and white construction paper 31 by 19 cm
  3. linoleum 16 by 12 cm
  4. carbon paper
  5. lino knife
  6. flat piece of glass 
  7. block printing ink
  8. lino roller
  9. lino press
  10. glue

The painting The bedroom is from 1888. View this painting and discuss it  using elements of art. What do you see? What stands out? What do you see on the wall? What can you say about the perspective? What materials did Van Gogh use? What do you think about the colors? Do you like the painting or not, and why is that?  

Print the image below on 12 by 16 cm for each student. 

Transfer the white lines from the image to the linoleum using carbon paper and a pen. Cut out the white lines and parts. 


Cut out your name in mirror writing at the bottom left. 
Make four prints: two with white paint on black paper and two with black paint on white paper. Let dry. 
Stick the white sheets on black paper and the black sheets on white paper. Use 1 cm of the sheets to stick them together.

all artworks of grade 6

Elements of art: color, space, line. 

Saturday, April 1, 2023

Paint like an impressionist

This lesson is an exercise for painting an impressionist work.

You need:
  1. white drawing sheet
  2. tempera paint in red, blue and yellow
  3. small brushes
  4. paper towels
View impressionist paintings, for example from Claude Monet or Van Gogh. Zoom into Starry Night from Van Gogh using this link
What do you see?
  • the painting is made out with loose dashes.   
  • the dashes indicate a direction or movement, they are not just placed.
  • you can see the canvas between the dashes. The color of the canvas is therefore part of the painting. 
View a sunset picture. 


What do you see?
  • the sun is reflected in the water 
  • the sun's rays point left, up and right
  • the horizon is half way the photograph 
Exercise before you get started: 
  • Practice painting short strokes on a scrap. To do this, always lift the brush from the paper.
  • Practice with two colors on your brush; do not mix!
  • Make narrow / wide strokes by turning / not turning your brush.
  • Clean the brush for a new color with a paper towel, do not use water!
And now the artwork:

  • Fold your drawing sheet in half lengthwise, this is the horizon line.
  • Draw with pencil a semicircle on the horizon line, this is the sun.
  • Paint the sun orange: apply red and yellow to your brush. Do not mix!
  • Paint the sun's rays with yellow and very little red. Put something on your brush of both colors and make short strokes by lifting the brush from the paper each time. Also leave white between the strokes.
  • Also make the reflection of the sun in the water. Beware: the direction of the brushstrokes is now horizontal, just like the water.
  • Make the sky with blue and white (again add two colors to the brush). Use white to make a lighter blue. Follow the direction of the sun's rays. Don't make the sky completely full, you have to keep seeing paper.
  • Paint the sea with blue, white (and maybe green). Do not mix! The direction is horizontal here. Think of the white space between the lines.
Elements of art: line, color, nuance.

Tuesday, February 7, 2023

Design a chips bag


 You need:
  1. drawing paper 
  2. pencil
  3. pictures of chips bags 
  4. color pencils
  5. black marker 
Look at chips bags and discuss what stands out. 
  • the name of the chips is usually at the top of the bag
  • the name is large and sometimes in 3D letters 
  • bright colors
  • taste and weight is on it
  • it has an image of one or more chips 
  • special features can be on it, like New, Party Pack or Less Fat 

Draw the wavy outlines of a chips bag. Think of a name and flavor for your chips. Draw the name on the bag in large 3D letters. Draw some chips on the front. Write the weight on the bag and some details. 
Color with color pencils or aquarel pencils. Outline letters and details with a fine black marker. 

Thanks to Pascal Cuijpers and his students (Connect College, Echt - NL) for this lesson.