Showing posts with label tempera. Show all posts

Friday, October 27, 2023

Autumn birches


You need: 

  1. drawing sheets A3 size
  2. painters tape in several widths
  3. liquid watercolor paint in red, green and yellow in rood, geel en groen
  4. brushes
  5. tempera paint  
  6. stipple brush
  7. old shopping card/customer card
  8. saucers
  9. jars
Choose thick drawing paper,  to avoid ripping when you remove the tape . 

Look at birch trees. What do you see?   
 

  • straight trunks
  • trunks are white
  • horizontal peeling bark banden
  • autumn color leaves: orange, yellow, brown, red
What to do?

Step 1
Palce the sheet on the table with the narrow site down.  Stick strips of tape from top to bottom. Wide for the trunks, narrower for the branches. Note: branches grow up and not down. 


Step 2
Paint the background in strips with diluted liquid watercolor. Let dry. Peel off the tape carefully. 

Step 3
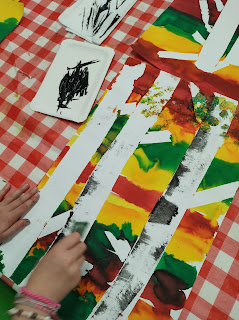
Put some black tempera paint on a saucer. Dip your customer card in the paint. Pull this in several places from left to right (or right to left!) to halfway up the trunk to make the black streaks.

  
Step 4
Spray som warm colors tempera + green on a saucer.  Stipple leaves at the top of the trees using the stipple brush. Do not mix the colors, but use several colors at the brush at the same time.  


Step 5
Hang up! 


Artworks are made by students of grade 1. 

Friday, April 28, 2023

On Monet's bridge


You need: 

  1. drawing sheet A3 size
  2. tempera paint
  3. brushes
  4. white construction paper
  5. scissors
  6. oilpastels
  7. glue
Claude Monet (1840-1926) is considered one of the most important painters of Impressionism. 

 Typical for Impressionists:

  • they choose subjects from ordinary life 
  • special attention for light and color
  • work in the open air
  • smooth brushstrokes
  • dashes resemble a sketch
  • it's about the impression!

Discuss the term impressionism. Show some paintings by Monet and zoom in on a work with water lilies in Arts & Culture. Do students see the characteristics of impressionism in this artwork?

Monet had a large garden with a pond and a Japanese bridge in Giverny France. He liked to paint in that garden. His works of water lilies are therefore famous and are the basis of this lesson.


Lesson 1
Draw a horizon line above the middle of your sheet. Paint the pond and the sky with short brush strokes, like Monet did. Do not mix the paint, but take two colors on your brush.  Make sure the blue color of the pond is not the same color as the sky.
Paint trees on both sides of the sheet in the same way. Paint water lilies in the pond. Be sure that they are larger in the front of the pond than in the back.  


Lesson 2
Have someone take a picture of you that shows you all the way. Print the photo and cut it out. 
Cut three parallel arcs from about 1,5 cm wide from the construction paper.  Then cut four straight pieces of 1,5 cm wide. Paste the photo on the work and paste the bridge over it. 


All artworks are made by students of grade 6

Source: MaryMaking.blogspot.com

Tuesday, April 4, 2023

Starry Night like Vincent van Gogh


Show during both lessons hVan Gogh's painting Starry Night.  


Tell about Vincent van Gogh. Show Starry Night. Zoom in on the painting with Arts & Culture

The artwork students are going to make, will take two lessons.  

You need for the 1st lesson:
  1. black construction paper 
  2. aluminium foil
  3. piece of cardboard or a clay plate
  4. painter's tape
  5. tempera paint in blue and white 
  6. cotton swab
  7. brushes
  8. plate

Lesson 1
Wrap the cardboard/clay plate with aluminum foil and tape it on the back side. 

Step 1: For each pair of students there is a palette with blue and white paint. Students paint spiral shapes ons the aluminum foil with a brush and / or cotton swabs.


Stap 2: Make a print by placing a black sheet on top of your painting and pressing it.  

Stap 3: Remove the black sheet and let dry. 


 You need for the 2nd lesson:

  1. oilpastels in black, grey and purple
  2. tempera paint in yellow and white 
  3. black construction papier
  4. brushes
  5. scissors
  6. glue
  7. plate
Step 4: Draw and color the mountains with oilpastels. Draw the wavy movements in the air. The lines must run parallel to each other and also go in the same direction during a movement.
Show students that you can fade the colors by smearing the oil pastel. This way you can also make the colors darker or lighter.


Step 5: Determine where the large dark cypress should be and cut it out of black paper. (In grade 3 we gave students a shape to trace for the cypress.)


Step 6: Cut houses and glue them on tje painting. Draw lighted windows with oilpastels.  


Step 7: Paint moon and stars with tempera. 

Artworks are made by students of grade 3.

Elements of art: color, line, nuance, texture.


Monday, April 3, 2023

Water lilies on a plate


By a student of grade 1

Claude Monet (1840-1926) is considered one of the most important painters of Impressionism. 

 Typical for Impressionists:

  • they choose subjects from ordinary life 
  • special attention for light and color
  • work in the open air
  • smooth brushstrokes
  • dashes resemble a sketch
  • it's about the impression!

Monet had a large garden with a pond and a Japanese bridge in Giverny France. He liked to paint in that garden. His works of water lilies are therefore famous.

Discuss the term impressionism. Show some paintings by Monet and zoom in on a work with water lilies in Arts & Culture. Do students see the characteristics of impressionism in this artwork?

You need:
  1. paper plates
  2. tempera paint in blue and white 
  3. stencil brush
  4. white drawing sheet 
  5. tissue paper in green an light green 
  6. water and sponge
  7. tissue paper in pink and yellow
  8. mold of a water lily leaf
  9. glue
  10. scissors
Step 1:
Dab the plate with blue and white.  


Step 2:
Wet the white paper with a sponge. Cut squares from the green tissue paper. Place them on the wet paper and let the bleed. Let dry.


Step 3
Remove the tissue paper. Trace the mold of the lilyflower leaf and cut it out.  


Step 4
Fold the tissuepaper for the lily twice diagonally. Cut a flower shape. 


Step 5
Grab the flower shapes in the middle. Crumple them into a flower. Put a drop of glue on the lily leaf and stick the center of the lily on top. Roll a wad of leftover tissue paper and stick it in the center of the flower.

Elements of art: texture, color, space. 

Saturday, April 1, 2023

Paint like an impressionist

This lesson is an exercise for painting an impressionist work.

You need:
  1. white drawing sheet
  2. tempera paint in red, blue and yellow
  3. small brushes
  4. paper towels
View impressionist paintings, for example from Claude Monet or Van Gogh. Zoom into Starry Night from Van Gogh using this link
What do you see?
  • the painting is made out with loose dashes.   
  • the dashes indicate a direction or movement, they are not just placed.
  • you can see the canvas between the dashes. The color of the canvas is therefore part of the painting. 
View a sunset picture. 


What do you see?
  • the sun is reflected in the water 
  • the sun's rays point left, up and right
  • the horizon is half way the photograph 
Exercise before you get started: 
  • Practice painting short strokes on a scrap. To do this, always lift the brush from the paper.
  • Practice with two colors on your brush; do not mix!
  • Make narrow / wide strokes by turning / not turning your brush.
  • Clean the brush for a new color with a paper towel, do not use water!
And now the artwork:

  • Fold your drawing sheet in half lengthwise, this is the horizon line.
  • Draw with pencil a semicircle on the horizon line, this is the sun.
  • Paint the sun orange: apply red and yellow to your brush. Do not mix!
  • Paint the sun's rays with yellow and very little red. Put something on your brush of both colors and make short strokes by lifting the brush from the paper each time. Also leave white between the strokes.
  • Also make the reflection of the sun in the water. Beware: the direction of the brushstrokes is now horizontal, just like the water.
  • Make the sky with blue and white (again add two colors to the brush). Use white to make a lighter blue. Follow the direction of the sun's rays. Don't make the sky completely full, you have to keep seeing paper.
  • Paint the sea with blue, white (and maybe green). Do not mix! The direction is horizontal here. Think of the white space between the lines.
Elements of art: line, color, nuance.

Sunday, November 27, 2022

Scratch a Christmas ball

You need:
  1. drawing sheet
  2. oli pastels or crayons
  3. black tempera paint 
  4. brush
  5. alufoil 
  6. ribbon
  7. toothpick or skewer
Color the sheet with crayons. Paint it over with black tempera paint and let dry. Scratch with a toothpick or skewer a Christmas ball and fill it with patterns. 
Cut a small piece of aluminumfoil and paste it on the ball with a folded ribbon under it. 

made by students of grade 6

Elements of art: line (pattern)


Monday, November 21, 2022

Winter tree in warm-cool colors

 You need:

  1. drawing sheets 25 x 32,5 cm
  2. crayons
  3. watercolor paint
  4. black tempera 
  5. brushes
  6. jar with water
With crayon: draw a horizonline and a tree trunk from the bottom of the sheet. Draw branches that touch the edges of the sheet. Draw a pattern in the landscape below the horizon. 
With watercolor paint: paint the sky. Paint the surfaces between the branches in warm or cool colors. Paint the surfaces in the landscape: warm if you first chose cool, cool if you first chose warm. 
With tempera: paint the branches and trunk black. 

Elements of art: color (warm and cool), space, line (pattern)

artworks made by students of grade 4

Saturday, October 29, 2022

Still life with fruit

door leerlingen van groep 5

You need:
  1. corrugated cardboard
  2. scissors
  3. white drawing sheet
  4. tempera paint
  5. brush
  6. glue
  7. colored construction paper
Vies and discuss still lifes of fruit in different styles (for example Caravaggio and Cezanne). How is the fruit arranged? Why at that way? Which parts are light and which parts are dark? What does that mean? 


Provide each group of students with a bowl of different fruit types. Students paint the fruits (no drawing first!) after a good observation. 
Cut a fruit bowl out of the cardboard. Cut out the fruits with a small white edge. Stick the fruits on a colored sheet, be sure to let them overlap each other. Stick the cardboard bowl. Some fruits will partly disappear in it. 

Elements of art: space, color, value. 

Tuesday, October 18, 2022

In 'The Factory' of Andy Warhol

made by students of grade 1

You need: 

  1. colored paper 12 by 12 cm
  2. black construction paper 50 cm by 15 cm 
  3. tempera paint
  4. brushes
  5. apples
  6. glue
  7. black marker 

Tell about Andy Warhol's Factory. 

First lesson: "We are going to work today in the factory of Andy Warhol. Choose four colored sheets. Make apple prints in complementary colors: on a blue sheet you print an orange apple, on a red sheet you print a green apple etc."

Let dry and paste the colored sheets on black construction paper.

Second lesson: make a second print in a complementary color: on the orange apple you print a blue one etc. Let dry. Outline the apples with a black marker and add seeds and stem. 


Friday, August 26, 2022

Birthday calendar in one color


You need:


  1. drawing sheet

  2. tempera paint

  3. ruler

  4. pencil

  5. black marker


Draw with pencil a geometric shape in the middle of the sheet. Draw horizontal and vertical lines to divide the background in rectangles. Do the same within the shape. Paint the rectangles in values of one color, using a basic color + black and white. Start with the lightest color. 


Outline all shapes with black marker.


Elements of art: color, line, shape, value 


Friday, August 12, 2022

Life-size Keith Haring groupwork


Show Haring's works and discuss them: 


  • comic like people


  • few details

  • thick black outlines

  • bright colors

  • dashes that indicate movement 


You need:


  1. life-size drawing sheets.

  2. tempera paint

  3. brushes grote vellen schetspapier 


Paste drawing sheets together. There must fit a child on it. 


Make groups of 4 students. Trace one student of each group using a black marker.


 Students paint the traced figure in one color. Fill the rest of the sheet with patterns in black paint. 


Saturday, October 30, 2021

Mondriaan collage with printed lines


You need:


  1. paper in primary colours

  2. white sheet A3 size 

  3. pieces of cardboard 

  4. black tempera paint

  5. saucer

  6. ruler 

  7. pencil 

  8. scissors 


Just like Piet Mondriaan (De Stijl), students draw rectangles and squares using ruler and pencil on construction paper in yellow, blue and red.  After this the drawings have to be cut and pasted on a white sheet. However Mondriaan did not: students may stick colours together.  


Stamp straight lines using a piece of ribbed cardboard and black tempera paint. 


Made by a student of grade 3 


Source: http://artroom104.blogspot.nl/ 

Thursday, October 14, 2021

Happy monsters

You need:


  1. drawing sheets A3 size

  2. markers

  3. tempera paint


Draw happy monsters! Not the scary types, but the nice ones with big eyes. Color with markers, background with tempera. Outline with black marker.


Made by students of grade 6


Wednesday, September 15, 2021

Sawing like Piet Mondriaan


Made by a student of grade 3


You need:


  1. black construction paper

  2. plywood  

  3. ruler and pencil

  4. tempera paint in primary colors kleuren + white

  5. brush

  6. coping saw

  7. sandpaper

  8. glue


Divide a rectangular piece of thin plywood into rectangles and squares using ruler and pencil and saw them. Place every piece directly on the right spot the black construction paper. All pieces have to form a rectangle again. 


Sand the edges of pieces. Paint the pieces in primary colors and white. Past them on the black sheet. 

Monday, August 23, 2021

The very lonely firefly


You need:


  1. black construction paper

  2. tempera paint

  3. brushes

  4. gold and silver markers

  5. pencils


Book: The very lonely firefly from Eric Carle (also to be found on YouTube)


Students use white tempera to paint two or more jars at the bottom of the black sheet. They mix yellow and blue to paint grass in different shades of green over the jars. Draw fire flies with gold and silver markers and color them with pencils. 


Thursday, June 24, 2021

A day at the beach


Artworks made by students of grade 5


You need:


  1. drawing sheet A3 size

  2. white drawing sheets

  3. tempera paint

  4. brushes

  5. scissors

  6. markers and/or pencils

  7. glue

  8. pencils


Talk about a day at the beach: things (to do) on the sand, things (to do) in the water and things (to do) in the air. Talk about people standing in the water: they seem to have half legs!


Cover four tables with newspaper and put three containers with paint on it:


  • yellow and a little brown besides (beach) + two big brushes

  • blue and a little green (seawater) + two big brushes

  • blue and white (air) + two big brushes 

  • white (surf) + two brushes to stamp


Show how to paint the beach: a lot of yellow on the brush and a little brown for the beach (do not mix!). Do the same with blue and white for the air, and blue with green for the sea. Make wavy motions with the brush to accentuate the water. Finish with a white stamping brush for the surf.


While four students are painting, the others can start with the drawing part of this lesson: draw people and things you see on the beach. Color with markers or color pencils. Cut those little drawings and paste them on the beach, the water or in the air.