Showing posts with label drawing. Show all posts

Monday, March 18, 2024

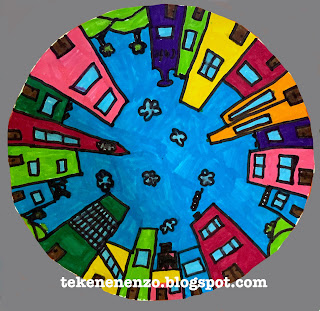
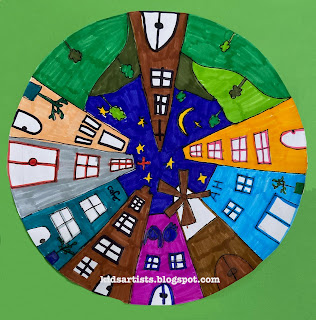
Circle City


You need: 

  1. white drawing sheet
  2. compass
  3. ruler
  4. pencil
  5. markers
  6. colored sheet
  7. glue

Explain the one-point perspective: objects that are further away appear smaller. If we draw a street towards the horizon, it narrows and trees get smaller. 

In one-point perspective you draw all lines parallel to the viewing direction to one point. You literally put a dot on the horizon. 

What to do? 

  • Draw a circle of 20 cm in diameter using the compass. Mark the hole in the center with a dot.  
  • Draw lines form the edges of the circle to the dot in the middle, using ruler and pencil. 
  • Draw buildings in different heights using the lines.  Draw doors and windows. 
  • Color with markers. Outline everything with a fine black marker. 
  • Cut the circle and stick it on a colored sheet. 

Art work made by students of grade 4. 

Sunday, August 6, 2023

Sail with the VOC

 
by students of grade 6

 You need:

  1. drawing sheet A3 size
  2. drawing sheet A4 size
  3. liquid water color
  4. brush
  5. oil pastel crayons
  6. scissors and glue
  7. ice cream sticks
  8. boxcutter
  9. cutting plate
  10. newspapers 
  11. paper towels
Towards the end of the Golden Age, the Netherlands are at war with England, a battle that is being fought at sea. 
In this lesson students draw a sea ship from that time. 

Study paintings of ships in a battle. What stands out? How do you recognize the Dutch and English ships? Which flags do you see more? What do you see in the foreground of the first painting? What can you tell about the sails? How can you see those ships are in combat? 

Naval battle Anglo-Dutch war(1666). Painter: Abraham Storck

Burning of a part of the English fleet (1667). 
Painter: Pieter van de Velde 

What should you do?
Step 1
First you paint the background on the largest sheet with liquid water color paint. At the bottom (near by) the water is dark, further away it becomes lighter (add water). 

Step 2
Draw on the A4 sheet a VOC-ship with oil pastel and color it. Draw and color extra things which you also see in the water during a naval battle, such as fire,, aa life boat, an anchor etc. Do not forget tho color the sails white!


Step 3
Paint your drawing with blue water color paint. Wipe the excess paint off the white sails with a paper towel. Let dry. 

Step 4
Cut out all parts, leaving a blue edge. Stick ice cream sticks behind the loose parts. Take the large blue painted sheet and decide where you want hour ship and the other things. Cut slices of about 3 cm in this sheet. Insert the sticks into the background and the artwork is done. 

Source: Laatmaarleren.nl 
Saturday, August 5, 2023

Portraits like Rembrandt

You need:

  1. drawing sheets A4 size
  2. charcoal
  3. paper towels
  4. black construction paper for background 
Chiaroscuro is a tecnnique in artworks which display an extreme contrast is between light and dark to create a dramatic effect. 

Titus, son of Rembrandt van Rijn (Rembrandt, 1660)

Narcissus, the man who fell in love with himself, Caravaggio (1597-1599)

Show these two paintings. What do you see? Where are the dark parts, where the light ones? Why is that? What's the artists goal? What do you feel when you see these paintings?

Students sit in pairs facing each other and create a portrait of each other using hatching and swiping techniques. Of course the background is dark, the face light.

by students of grade 4  

Wednesday, August 2, 2023

Dutch canal houses: indian ink and soft pastels


You need: 

  1. drawing sheets
  2. pencil
  3. ruler
  4. indian ink
  5. dip pen
  6. soft pastels
Dutch canal houses are famous for their facades: stepped gable, neck gable, bell gable, clock gable or spout gable. Show pictures of those five gables and discuss them. Show photographs from canal houses and discuss the other features of canal houses: the stairs, symmetry, windows, ornaments, shutters. 
Students draw a line on their sheet about 5 cm from below. This is the canal. At the end you can glue all drawings together to get a long street full of canal houses. Sketch the houses lightly with a grey pencil. Indicate the places of windows, stairs, doors and shutters. Draw small boats in the canal. Draw the houses with indian ink and color them with soft pastels.

by students of grade  6

Monday, May 8, 2023

Tropical birds in chalk pastel


You need:

  1. black construction paper
  2. black oil pastels
  3. chalk pastels
  4. fixative spray
View photo's of tropical birds and discuss them. 
Draw on the black sheet a bird on an branch using black oil pastel. Color with chalk pastels and finish it with fixative spray. 


Monday, November 7, 2022

Transport in the style of Hundertwasser


Friedensreich Hundertwasser (1928-2000) was an Austrian artist and architect who is best known for the colorful buildings he designed, built with attention to the environment and natureThe buildings of Hundertwasser are very recognizablestraight lines are missingthere is use of bright colors and many of his buildings have typical turrets. The influence of architect Gaudi is obvious.


The paintings of Hundertwasser have exuberant colours too and mainly undulating lines.


Show buildings of Hundertwasser on the digital board. Discuss the salient  features: bright coloursundulating linesThen show some paintings and discuss the things that stand out:


 the use of small areas outlined with black

 no straight lines, usually parallel lines

 recurring spiral shapes

 bright colours


Tell students they are going to draw means of transport in the style of Hundertwasser. 


You need:


  1. drawing sheet

  2. pencil

  3. markers


Draw a car, plane, boat or something you think is a mean of transport. Fill it with lines and patterns like Hundertwasser did. Cut your drawing and paste all means of transport on a great colored sheet. 

Friday, August 12, 2022

Rembrandt's Cabinet of Curiosities


You need:


  1. drawing sheet 12 by 12 cm

  2. indian ink

  3. dip pen

  4. pencil

  5. black construction paper

  6. glue

  7. various shells


Rembrandt was a painter, etcher and draftsman, but also an art dealer. In 1656 he went bankrupt and to pay the creditors his possessions had to be sold. An official made a list of all the things that were in Rembrandt's house. There was, for example, a large collection of objects from various continents in the art chamber, also known as 'cabinet of curiosities'.


In the room were dried animals, shells, spears from Indonesi, glass from Venice, a lion's skin and a box with coins and tokens. Sailors of the VOC often took the objects with them to the Netherlands as souvenir.


Etching of a shell, Rembrandt, 1650 (Rijksmuseum)


Discuss how ethings are made. Why does an etching make more money then a painting or drawing? Why does the artist have to scratch his signature in reverse on an etching?  


View etchings by Rembrandt. What stands out? 


  • very detailed

  • there are just lines

  • shading for dark areas

  • lifelike

  • black and white


First let students practice in using indian ink. How do you make thick or thin lines? How do you make light or dark areas? What is hatching? 


Students draw a shell like Rembrandt did.  Draw with pencil, trace it wiht ink. Make hatch lines for the dark area's.


Paste all student art works together on a black construction sheet: Rembrandt's Cabinet of Curiosities. 


Wednesday, January 12, 2022

Cat on head - like Corneille


Made by a student of grade 3

You need:


  1. drawing sheet A3 size

  2. oil pastels

  3. liquid watercolor paint

  4. brushes


Corneille painted often cats, birds and women. There are some paintings where he painted the cat on the head of a woman!

Show Corneille paintings on the digital board or use google: 'Corneille woman cat'.


Who of you has a cat at home? Does it ever lie with you? Does your cat ever lie on your head?


Look at these artworks. What do you see? Why would the painter left the cat's eyes white?  Do the women on the paintings have hair? 


Draw a head on your sheet with oilpastel (dark color). Maybe your own head, but you may choose another head too. Draw a cat sitting, standing or lying down on the head. The cat looks like hair! What hairstyle it is, had to do with the position of the cat. 


Color your drawing with bright colors. Trace the outlines with a dark color if necessary and paint the background with liquid watercolor paint. 


Made by a student of grade 3


There are more lessons about Corneille on this blog! Use the search function. 

Thursday, December 16, 2021

Dancing Christmas trees


Made by a student of grade 1

You need:


  1. white drawing sheet

  2. pencil

  3. markers

  4. chalk pastels


Dancing Christmas trees are Christmas trees who look like them only because of the shape (rectangular) and decorations (balls, garlands and stars)! The trunks are much longer than the  the ordinary trees and because of the curves in them it looks they are dancing.  

Draw with pencil, colour with markers, outline with black marker and colour the background with chalk pastels.


Sunday, December 5, 2021

Happy new year!


Made by students of grade 6

You need:


  1. white drawing sheet A3 size

  2. water paint color

  3. brushes

  4. liquid water color paint

  5. crayons


Draw some Dutch canal houses and color them with water color paint. Use crayons to draw fireworks. Then paint the sky dark blue with liquid water color leaving  the edges white. 

Saturday, December 4, 2021

We wish you a merry Xmas


You need:


  1. green construction paper, 20 by 20 cm

  2. white tempera paint

  3. white pencil

  4. fine markers in white and black

  5. colored markers


Draw staves on the sheet using a white pencil. Make fingerprints for the snowmen: use the tip of your finger for the head, use your thumb for the body. Wait till the paint has dried. Use a black fine marker to draw brooms, branches=arms, stones=eyes+mouth. Draw the carrot = nose with orange marker and draw caps of hats on some of the snowmen.

Finally, draw the text of We wish you a merry Xmas (or another Christmas song) under the staves. 


Source: 50 Xmas things to make and do, Usborne

Friday, December 3, 2021

Silver and white Xmas tree


Made by a student of grade 4


You need:


  1. green construction paper

  2. silver marker

  3. white pencil


Draw the trunk of a tree in the middle of a sheet, starting at the bottom and ending about 2 inches from the top. Color the trunk with silver marker. 


Draw lines from the trunk to the right and left. Don't use a ruler! The lines become shorter to create a triangle.  


Draw Xmas decorations on the branches using a white pencil. 

Tuesday, November 30, 2021

Landscape with chalk pastels


Made by students of grade 5


You need:


  1. black construction paper

  2. black oil pastels

  3. soft pastels

  4. hairspray


Show several hillsides and discuss what you see:  light/shadow, depth, overlapping, colours, pointed/rolling. 


Students draw with pencil a simplified hillside on the black sheet. In the blogpost 'Peaks and Valleys' a step by step explanation how to draw this. Give students a maximum of 5 minutes for this part of the lesson, to prevent them of drawing all kinds of details.


Trace the pencil lines with black oil pastel. Colour the hills and sky using chalk pastels. Color and mix, smear and blend until you're satisfied. Be sure the difference can be seen between the light-iluminated parts of the hills and the parts that are in shadow. 


Trace after coloring the black lines again if necessary. Fix the artwork with hairspray. 

Thursday, November 11, 2021

Catching leaves


Made by students of grade 4

You need:


  1. white drawing sheet A3 size

  2. oil pastels

  3. liquid water color paint

  4. brushes


Students trace their hands (thumbs point to each other) on the bottom of the sheet and color them with oil pastels. They draw swirling autumn leaves above the hands and color them with oil pastels too. Paint the background with diluted liquid water color paint and leave some space on the edges.


Monday, August 23, 2021

The very lonely firefly


You need:


  1. black construction paper

  2. tempera paint

  3. brushes

  4. gold and silver markers

  5. pencils


Book: The very lonely firefly from Eric Carle (also to be found on YouTube)


Students use white tempera to paint two or more jars at the bottom of the black sheet. They mix yellow and blue to paint grass in different shades of green over the jars. Draw fire flies with gold and silver markers and color them with pencils. 


Thursday, May 13, 2021

Patterned peacock


Artworks made by students of grade 4


You need:


  1. drawing sheet 20 by 20 cm

  2. color pencils

  3. markers

  4. colored construction paper

  5. glue


Draw a small peacock on the bottom of the white sheet. Draw lines from peacock to the sides and top of the sheet. Color patterns with color pencils or markers or a combination of them. Outline peacock and 'feathers' with a black marker.

Cut the peacock (look at the pictures) and paste it on a colored sheet.


Wednesday, May 12, 2021

Fruit in complementary colors


You need:


  1. white sheets 20 by 20 cm

  2. pencil

  3. ruler

  4. oilpastels

  5. watercolor paint

  6. brushes

  7. jar with water


This lesson is originally from Miriam Paternoster's fantastic art lesson website: Arteascuola. 

Follow the link for a description of this lesson and be sure to look around there for more great art lessons!


By students of grade 4


Thursday, April 29, 2021

Birdies on a branch


Made by a student of grade 1


You need:


  1. liquid water color paint

  2. brushes

  3. crayons

  4. white sheet

  5. feathers

  6. glue


Draw a branch with some birdies on it. Their eyes should be big and white! Color the birds with crayons using bright colors. Paint the branch and background with water color paint. Let dry. Draw feet and paste feathers. 

Thursday, April 8, 2021

The sky is the limit


Golden Gate Bridge, made by Elize, grade 6


You need:


  1. grey paper A4 size

  2. white and black pencils

  3. pictures of famous skylines


During a visit to the Museum in The Hague, I saw an artwork that Escher had made on gray paper. The only colours he had used were black and white. Together with the gray, you do have a lot of colours at your disposal. The Escher drawing I saw then, was the inspiration for this lesson.


Show photos of some famous skylines. Discuss skylines, skyscrapers and remarkable buildings. Ask children to search a skyline on the internet. Print this in black and white and then copy it so you can see the shadows of the buildings (settings light - dark on copyer). Students draw with just white and black pencil on the grey sheet.


Sydney skyline by Adnan, grade 6

Thursday, December 10, 2020

Little lights for gray days


You need:


  1. grey sheets 

  2. black fine marker 

  3. chalk pastels


Draw a wavy line on the sheet. Draw little circles or ovals and color them with pastels. Wipe the chalk out slightly for a nice halo.


Made by students of grade 1