Showing posts with label watercolour paint. Show all posts

Friday, October 27, 2023

Autumn birches


You need: 

  1. drawing sheets A3 size
  2. painters tape in several widths
  3. liquid watercolor paint in red, green and yellow in rood, geel en groen
  4. brushes
  5. tempera paint  
  6. stipple brush
  7. old shopping card/customer card
  8. saucers
  9. jars
Choose thick drawing paper,  to avoid ripping when you remove the tape . 

Look at birch trees. What do you see?   
 

  • straight trunks
  • trunks are white
  • horizontal peeling bark banden
  • autumn color leaves: orange, yellow, brown, red
What to do?

Step 1
Palce the sheet on the table with the narrow site down.  Stick strips of tape from top to bottom. Wide for the trunks, narrower for the branches. Note: branches grow up and not down. 


Step 2
Paint the background in strips with diluted liquid watercolor. Let dry. Peel off the tape carefully. 

Step 3
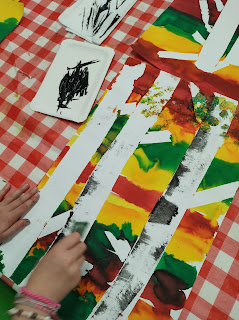
Put some black tempera paint on a saucer. Dip your customer card in the paint. Pull this in several places from left to right (or right to left!) to halfway up the trunk to make the black streaks.

  
Step 4
Spray som warm colors tempera + green on a saucer.  Stipple leaves at the top of the trees using the stipple brush. Do not mix the colors, but use several colors at the brush at the same time.  


Step 5
Hang up! 


Artworks are made by students of grade 1. 

Friday, October 20, 2023

One pumpkin, four materials


You need:

  1. drawing sheet
  2. color pencils
  3. watercolor paint
  4. oilpastels
  5. soft pastels
Fold the sheet in four. Draw 4 pumpkins. Color them with different materials. 

Tuesday, December 13, 2022

3D winter or Christmas scene


made by students of grade 5/6

You need: 

  1. white cardboard 21 by 21 cm
  2. colored glace paper 14,5 by 14,5 cm
  3. cutting knife 
  4. cutting mat
  5. glue

Too difficult or not enough time? Skip step 1 and 2. 

Step 1
Draw a square at 2 cm from the edges, this is the outside of the frame. 

Step 2
Draw in this square another square at 3 cm of the edges: this is the front of the frame.  

Step 3
Draw in the 15 by 15 cm square a simple winter or Christmas scene.  Make the lines 1 cm wide and make sure they are on 4 sides attached to the 1 cm wide frame. See pattern below. 

Step 4
Color the parts you have to cut out grey.  

Step 5
Cut out the grey parts. 

Step 6
Cut the corners diagonally, see pattern. 

Step 7
Fold the lines of the 15 by 15 square. 

Step 8
Stick the corners.

Step 9
Stick the glace paper in the frame. 


Elements of art: line, form, space.


Monday, November 21, 2022

Winter tree in warm-cool colors

 You need:

  1. drawing sheets 25 x 32,5 cm
  2. crayons
  3. watercolor paint
  4. black tempera 
  5. brushes
  6. jar with water
With crayon: draw a horizonline and a tree trunk from the bottom of the sheet. Draw branches that touch the edges of the sheet. Draw a pattern in the landscape below the horizon. 
With watercolor paint: paint the sky. Paint the surfaces between the branches in warm or cool colors. Paint the surfaces in the landscape: warm if you first chose cool, cool if you first chose warm. 
With tempera: paint the branches and trunk black. 

Elements of art: color (warm and cool), space, line (pattern)

artworks made by students of grade 4

Sunday, December 19, 2021

Xmas angels


Made by students of grade 3

You need:


  1. white drawing sheet

  2. watercolour paint

  3. brushes 

  4. black marker

  5. glitter 


Outline a saucer on a white sheet and cut it out. Draw an angel. Paint with watercolour paint. Outline with a fine glitter marker. 


Paste the artwork on another circle. 

Thursday, December 2, 2021

Colourful Christmas trees


You need:


  1. two drawing sheets A4 size

  2. watercolour paint

  3. brushes

  4. jar with water

  5. tissue paper

  6. scissors

  7. glue

  8. ruler

  9. pencil

  10. gold or silver marker

  11. white correction marker

  12. glitter


Paint a background for the Christmas trees with water paint. Use different colours and let them blend into each other. Use plenty of water for nice bright colours.

Choose three colours of tissue paper. Fold the sheets several times and cut triangles and squares. Take a sheet of drawing paper and make it wet with a brush and water. Lay the pieces of tissue paper on this wet sheet. If the tissue paper is not wet enough, it won't bleed. Then make it wet again with a brush with water. Fill the sheet with these tissue paper parts and leave it to dry. Remove the pieces of tissue paper from the sheet when it is completely dry. The sheet will look like this:


Cut long triangles from the sheet that was coloured with tissue paper. You may use the schedule above (based on A4 size sheet of 21 by 29 cm - half cm will remain on both sides then). You can cut a piece from the bottom of the triangles if you want trees of various heights.

Paste these three trees with overlap on the water paint background. Don't paste the trees all at the same height, so you get depth. Cut some smaller triangles from the left overs if you want more trees.

Outline the trees with silver or gold marker. Draw a simple branch structure. Draw the strains with brown pencil or use the metallic pins. Draw snowflakes around and on the trees with a white (correction) marker or use chips from the punch. rond en op de bomen. Paste the artwork on a coloured background. Sprinkle some glitter on the forest floor.


All artwork is made by students of 11-12 years old

Wednesday, June 16, 2021

Oscar the Octopus


You need:


  1. drawing sheet A2 size

  2. oilpastels

  3. liquid watercolor paint

  4. jar with water

  5. brushes

  6. salt


After a story about Oscar the Octopus and viewing some pictures of squids, students draw a squid in the sea. Big head, big eyes at the bottom of the head, eight tentacles that go over and under each other. These things should be seen in the drawing.


Color with oil pastels and draw patterns. Be sure the tentacles are going over and under each other - this has to be seen in the patterns.  Outline when necessary with a dark color.


Drip some liquid water color on the background after you made it wet. Sprinkle salt  for a great 'watery' effect.


All artworks are made by students of grade 3


Wednesday, May 12, 2021

Fruit in complementary colors


You need:


  1. white sheets 20 by 20 cm

  2. pencil

  3. ruler

  4. oilpastels

  5. watercolor paint

  6. brushes

  7. jar with water


This lesson is originally from Miriam Paternoster's fantastic art lesson website: Arteascuola. 

Follow the link for a description of this lesson and be sure to look around there for more great art lessons!


By students of grade 4


Wednesday, January 27, 2021

Valentine in the style of Robert Indiana


Made by a student of grade 2


You need:


  1. drawing sheet 20 by 20 cm

  2. water colour paint

  3. brushes

  4. fine black marker


A lesson about the famous LOVE sculpture of Robert Indiana. I used the Dutch word LIEF (meaning Nice, or I like you) 


Fold the sheet in four squares. Draw hearts in each part. Draw fat letters on the foreground. Fill letters and hearts with patterns and paint with water colour paint. Outline with fine black marker. 


Blogwriter in NY!

Sunday, December 13, 2020

Christmas trees in the snow


By students of grade 2


You need:


  1. large drawing sheets 

  2. liquid watercolour green and red 

  3. oilpastel crayons 

  4. brushes


Draw a wavy line, the ground. Draw several christmas trees. Simple triangles are okay, this lesson is about overlap - not all the trees next to each other. Decorate the trees with balls and garlands and draw presents under the trees. Colour with oil pastels. Use white oilpastel for snowflakes.

Paint with liquid watercolor, the ground has to stay white.

Sunday, July 12, 2020

Popsicles


Made by a student of grade 5

You need:


  • water colour paint

  • drawing sheet 25 x 25 cm

  • brush

  • white crayon

  • jarswith water


Dras six popsicles with a white crayon on a white sheet. Paint them with watercolour paint. Paint the background blue, leaving an edge from about 2 cm white.

Sunday, April 12, 2020

Veggies


Made by a student of grade 3

You need:


  1. veggies

  2. white drawing sheet

  3. liquid watercolour paint

  4. crayons

  5. indian ink

  6. brushes

  7. jar with water


Talk about veggies and why we all have to eat them. Show several veggies.


Use crayons to draw several veggies on your sheet. No overlapping.  Just draw the outlines, don't colour them with crayons.

Colour with liquid watercolour paint. Use two colours to make the paint bleed.

Paint the background dark grey with dilluted indian ink.