Showing posts with label markers. Show all posts

Monday, March 18, 2024

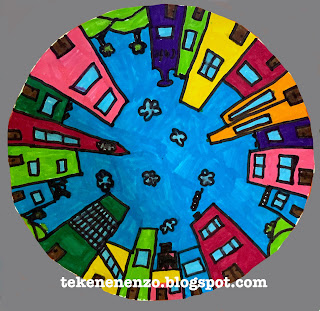
Circle City


You need: 

  1. white drawing sheet
  2. compass
  3. ruler
  4. pencil
  5. markers
  6. colored sheet
  7. glue

Explain the one-point perspective: objects that are further away appear smaller. If we draw a street towards the horizon, it narrows and trees get smaller. 

In one-point perspective you draw all lines parallel to the viewing direction to one point. You literally put a dot on the horizon. 

What to do? 

  • Draw a circle of 20 cm in diameter using the compass. Mark the hole in the center with a dot.  
  • Draw lines form the edges of the circle to the dot in the middle, using ruler and pencil. 
  • Draw buildings in different heights using the lines.  Draw doors and windows. 
  • Color with markers. Outline everything with a fine black marker. 
  • Cut the circle and stick it on a colored sheet. 

Art work made by students of grade 4. 

Saturday, July 8, 2023

Fun flowers


You need:
  1. white or colored drawing sheet
  2. scraps of colored paper 
  3. scissors
  4. glue
  5. black markers

Cut several circles from scraps of colored paper and paste them om the drawing sheet. Paste smaller circles on the bigger ones. Draw petals using several black markers in several thicknesses.   

Source: Krokotak.com

Monday, November 7, 2022

Transport in the style of Hundertwasser


Friedensreich Hundertwasser (1928-2000) was an Austrian artist and architect who is best known for the colorful buildings he designed, built with attention to the environment and nature. The buildings of Hundertwasser are very recognizable: straight lines are missing, there is use of bright colors and many of his buildings have typical turrets. The influence of architect Gaudi is obvious.


The paintings of Hundertwasser have exuberant colours too and mainly undulating lines.


Show buildings of Hundertwasser on the digital board. Discuss the salient  features: bright colours, undulating lines. Then show some paintings and discuss the things that stand out:


• the use of small areas outlined with black

• no straight lines, usually parallel lines

• recurring spiral shapes

• bright colours


Tell students they are going to draw means of transport in the style of Hundertwasser. 


You need:


  1. drawing sheet

  2. pencil

  3. markers


Draw a car, plane, boat or something you think is a mean of transport. Fill it with lines and patterns like Hundertwasser did. Cut your drawing and paste all means of transport on a great colored sheet. 

Sunday, November 6, 2022

In the style of Henrique Matos


You need:


  1. white drawing sheet A4 size

  2. liquid water colour

  3. jar with water

  4. compasses

  5. ruler

  6. pencil

  7. black waterproof markers


Henrique José Teixeira Matos is a Portugese painter. He is born in 1961 in Oporto.  Matos painted landscapes, portraits and abstract works, but is best known for his op-art work.

Show pictures of Matos's work on Wikimedia Commons. Look especially the op-art works and discuss what you see.


More op-art lessons on this blog can be seen following the link Op-art.


Paint a white sheet of paper with liquid watercolour and a lot of water a plain background.


Drip some liquid water colour on the surface while it is still wet. Use more water if the colours won't flow. Leave the sheet to dry.


Use compasses to draw some small circles (2 cm average) on the sheet. Draw wider circkels around them. Fill the sheet with those circles and half ones near the edges.


Draw lines from the middle of the circles to the edges. Be sure it's an even number of lines and  Kkeep the lines as much as possible equidistant from each other. Color the squares alternating with a black marker or pencil.


Op art hands


You need:


  1. drawing sheet

  2. pencil

  3. ruler

  4. markers 


Draw a grid on the sheet with squares from 2 cm by 2cm. Draw your hand or an object with a pencil. Color this alternately with black an a color of your choice.  Color the background squares with the same colors, but so that the checkerboard pattern reverses.


Sunday, October 30, 2022

Mondrian, a bit different

 You need:

  1. white drawing sheet
  2. markers
  3. ruler
  4. pencil
Draw a Mondrian, but change one of the elements of art. For example: 
  • do not draw squares and rectangles, choose another geometric shape
  • do not color with primary colors, choose maximum four other colors
Draw your alternative Mondrian and color it with markers. Outline with black marker. 

Elements of art: color, shape, line. 

Saturday, October 22, 2022

Keith Haring figures on tissue paper

made by students of grade 3

You need:
  1. colored tissuepaper
  2. white drawing sheet
  3. jar with water
  4. brush
  5. scissors
  6. templates of Haring figures
  7. pencil
  8. black marker

Choose 2 or more colors of tissuepaper. Fold them in 16 squares. Cut out. 
Take a sheet of drawing paper, make it wet with a brush and water. Lay the pieces of tissue paper on this wet sheet and see how they bleed. Fill the whole sheet and be sure to use enough water. 
Let dry and remove the tissue papers. 
Cut two or more Haring templates and outline them with a pencil. Trace those lines with black marker and trace them again to make nice bold lines. 

Sunday, October 16, 2022

Pumpkins like Yayoi Kusama

made by a student of grade 4

 You need:

  1. black construction paper
  2. colored paper
  3. black marker
  4. black fineliner
  5. scissors
  6. glue
  7. white pencil
Yayoi Kusama (1929) is a Japanese artist. She creates paintings, sculptures and large installations with mirrors and lots of light symbolizing infinity. All her artworks have one thing in common: polka dots. That's why she's affectionately known as 'the princess of polka dots'. 
From an early age Kusama wanted to make art, but her traditional Japanese parents didn't like this. That's why Kusama left for NewYork and joined artists there, including Andy Warhol. 

By adding all-over marks and dots to her paintings, drawings, objects and clothes she feels as if she is making them (and herself) melt into, and become part of, the bigger universe. She said:

‘Our earth is only one polka dot among a million stars in the cosmos. Polka dots are a way to infinity. When we obliterate nature and our bodies with polka dots, we become part of the unity of our environment’.

View and discuss artwork of Kusama. 
  • use of large and small polka dots 
  • backgrounds are often filled with triangles
  • use of bright colors
  • her installations suggest infinity
Draw three pumpkins on the colored sheets and cut them. Draw bigger and smaller dots on the segments with markers. Draw triangels on the black sheet with a white pencil - start with a zigzag line. Paste the pumpkins on the black sheet.


Wednesday, February 9, 2022

In the style of Burton Morris


You need:


  1. several colours construction paper

  2. black cardboard 20 by 20 cm

  3. coloured cardboard 20 by 20 cm

  4. scissors

  5. glue

  6. black thick marker


During our USA trip in the summer of 2009, I visited in the Coca-Cola Company in Atlanta, There I saw the artwork of Burton Morris for the first time: five paintings of cola bottles in pop-art style surrounded by light blue bubbles. So beautiful! Now I found a way to do this in school. And I think I'm the first blogger with a Morris lesson!


Burton Morris (Pittsburgh, 1964) is an American pop-art artist. He is influenced by pop-art artists from the 60's and 70's, like Warhol, Lichtenstein and Haring. Now he is one of the most famous modern post pop-art artist. Morris's work shows a contemporary twist to traditional pop-art. His work is cheerful, energetic and colourful. His characteristic lines with the bright colours give his work a fantastic energy. Morris's work is known of tv-series like Friends and also appears in major advertising campaigns by U.S. companies like AT & T, Pepsi and Heinz.


Show artwork of Morris on the digital board. Discuss the features: bright colours, black outlines, little detail, movement by little lines, white lines that suggest light and the distinctive black star shape around or in much of his work.

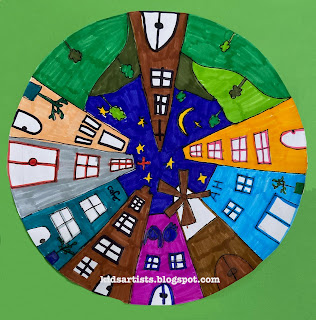
Students are going to make an artwork in the style of Burton Morris with the subject: Valentine's Day.

Step 1. Take two colours cardboard: black for the edge and one colour for the background. take a construction paper for the big heart.

Step 2. Cut the edges of the background cardboard sloping away, to make a sort of rug. You have to cut at least 1 cm around.

Step 3. Cut a large heart from the second coloured cardboard. Cut white 'light lines' from a white sheet for on and around the big heart.

Step 4. Cut some smaller hearts from several colours of construction paper. Cut white 'light lines' and paste them on the little hearts; all on the same side.

Step 5. Paste the big heart on the coloured cardboard. Paste the light lines on the heart and around it.


Step 6. Cut long triangles from the sides of the rug, the 'flashy stripes'. Paste the rug on the black cardboard.


Step 7. Paste the small hearts around the big heart; you may k de kleine hartjes rondom het grote hart, where you can go over the triangles. Outline the small hearts with a black marker.


Step 8. Cut the black background away, leaving about 2 mm on the edges.


Step 9. Paste the work on a coloured sheet (A4 size) and cut it into a square.


Made by students of grade 4 and 5
Thursday, December 16, 2021

Dancing Christmas trees


Made by a student of grade 1

You need:


  1. white drawing sheet

  2. pencil

  3. markers

  4. chalk pastels


Dancing Christmas trees are Christmas trees who look like them only because of the shape (rectangular) and decorations (balls, garlands and stars)! The trunks are much longer than the  the ordinary trees and because of the curves in them it looks they are dancing.  

Draw with pencil, colour with markers, outline with black marker and colour the background with chalk pastels.


Saturday, December 4, 2021

We wish you a merry Xmas


You need:


  1. green construction paper, 20 by 20 cm

  2. white tempera paint

  3. white pencil

  4. fine markers in white and black

  5. colored markers


Draw staves on the sheet using a white pencil. Make fingerprints for the snowmen: use the tip of your finger for the head, use your thumb for the body. Wait till the paint has dried. Use a black fine marker to draw brooms, branches=arms, stones=eyes+mouth. Draw the carrot = nose with orange marker and draw caps of hats on some of the snowmen.

Finally, draw the text of We wish you a merry Xmas (or another Christmas song) under the staves. 


Source: 50 Xmas things to make and do, Usborne

Friday, December 3, 2021

Silver and white Xmas tree


Made by a student of grade 4


You need:


  1. green construction paper

  2. silver marker

  3. white pencil


Draw the trunk of a tree in the middle of a sheet, starting at the bottom and ending about 2 inches from the top. Color the trunk with silver marker. 


Draw lines from the trunk to the right and left. Don't use a ruler! The lines become shorter to create a triangle.  


Draw Xmas decorations on the branches using a white pencil. 

Thursday, December 2, 2021

Colourful Christmas trees


You need:


  1. two drawing sheets A4 size

  2. watercolour paint

  3. brushes

  4. jar with water

  5. tissue paper

  6. scissors

  7. glue

  8. ruler

  9. pencil

  10. gold or silver marker

  11. white correction marker

  12. glitter


Paint a background for the Christmas trees with water paint. Use different colours and let them blend into each other. Use plenty of water for nice bright colours.

Choose three colours of tissue paper. Fold the sheets several times and cut triangles and squares. Take a sheet of drawing paper and make it wet with a brush and water. Lay the pieces of tissue paper on this wet sheet. If the tissue paper is not wet enough, it won't bleed. Then make it wet again with a brush with water. Fill the sheet with these tissue paper parts and leave it to dry. Remove the pieces of tissue paper from the sheet when it is completely dry. The sheet will look like this:


Cut long triangles from the sheet that was coloured with tissue paper. You may use the schedule above (based on A4 size sheet of 21 by 29 cm - half cm will remain on both sides then). You can cut a piece from the bottom of the triangles if you want trees of various heights.

Paste these three trees with overlap on the water paint background. Don't paste the trees all at the same height, so you get depth. Cut some smaller triangles from the left overs if you want more trees.

Outline the trees with silver or gold marker. Draw a simple branch structure. Draw the strains with brown pencil or use the metallic pins. Draw snowflakes around and on the trees with a white (correction) marker or use chips from the punch. rond en op de bomen. Paste the artwork on a coloured background. Sprinkle some glitter on the forest floor.


All artwork is made by students of 11-12 years old

Friday, November 5, 2021

Weaving like Mondriaan


Made by a student of grade 2


You need:


  1. white sheet A4 size

  2. colored paper strips in primary colours

  3. scissors

  4. glue

  5. black fineliner 


Fold the white sheet in half.

Cut evenly-spaced slits starting from the folded edge and continuing up to about a half inch from the opposite. Open up the paper.

Take one paper strip and weave it across the slits, going over and under them. Push the strip to the top and start with another one. The second strip should be woven in an opposite pattern as the first one. If the first strip goes over and under across the slits, the second one should go under and over the slits.

Continue weaving until the white sheet is full. Paste the ends of the strips on the white sheet.

Create a frame by pasting the artwork on black construction paper. Draw small patters on the white strips using a fine black marker. 

Thursday, October 14, 2021

Happy monsters

You need:


  1. drawing sheets A3 size

  2. markers

  3. tempera paint


Draw happy monsters! Not the scary types, but the nice ones with big eyes. Color with markers, background with tempera. Outline with black marker.


Made by students of grade 6


Wednesday, September 22, 2021

Mondriaan cube


You need:


  1. white cardboard

  2. ruler

  3. pencil

  4. cutting mat and knife

  5. markers

  6. glue


After a lesson about the work of Piet Mondriaan, students draw a template of a cube (nice goal for the math lesson!). The surfaces are 8 by 8 cm, the stick edges are 1 cm.


Cut the template with a cutting knife. Use a black fine marker to draw squares at 1/2-1 cm from the edges. Within these squares you draw straight lines to get some rectangles and squares. Color these using Mondriaan colors: red, yellow and blue. Leave some surfaces white.


Fold the stick edges and paste them to get the Mondriaan cube!


Monday, September 13, 2021

Patterned trees collage


You need:


  1. white drawing sheet A3 size

  2. liquid water color paint

  3. brush

  4. construction paper in several colors

  5. scissors and glue

  6. black fine marker


Fold the sheet in two. Paint the upper half blue, the  lower half green. Leave the edges white. 


Cut several shapes from construction paper: ovals, 'clouds', circles.   


Use a fineliner to draw the trunk and fill the shapes with a variety of patterns.  


Paste the shapes on the painted sheet and be sure the shapes overlap each other to suggest depth.


Monday, August 23, 2021

The very lonely firefly


You need:


  1. black construction paper

  2. tempera paint

  3. brushes

  4. gold and silver markers

  5. pencils


Book: The very lonely firefly from Eric Carle (also to be found on YouTube)


Students use white tempera to paint two or more jars at the bottom of the black sheet. They mix yellow and blue to paint grass in different shades of green over the jars. Draw fire flies with gold and silver markers and color them with pencils. 


Thursday, June 24, 2021

A day at the beach


Artworks made by students of grade 5


You need:


  1. drawing sheet A3 size

  2. white drawing sheets

  3. tempera paint

  4. brushes

  5. scissors

  6. markers and/or pencils

  7. glue

  8. pencils


Talk about a day at the beach: things (to do) on the sand, things (to do) in the water and things (to do) in the air. Talk about people standing in the water: they seem to have half legs!


Cover four tables with newspaper and put three containers with paint on it:


  • yellow and a little brown besides (beach) + two big brushes

  • blue and a little green (seawater) + two big brushes

  • blue and white (air) + two big brushes 

  • white (surf) + two brushes to stamp


Show how to paint the beach: a lot of yellow on the brush and a little brown for the beach (do not mix!). Do the same with blue and white for the air, and blue with green for the sea. Make wavy motions with the brush to accentuate the water. Finish with a white stamping brush for the surf.


While four students are painting, the others can start with the drawing part of this lesson: draw people and things you see on the beach. Color with markers or color pencils. Cut those little drawings and paste them on the beach, the water or in the air.


Thursday, May 13, 2021

Patterned peacock


Artworks made by students of grade 4


You need:


  1. drawing sheet 20 by 20 cm

  2. color pencils

  3. markers

  4. colored construction paper

  5. glue


Draw a small peacock on the bottom of the white sheet. Draw lines from peacock to the sides and top of the sheet. Color patterns with color pencils or markers or a combination of them. Outline peacock and 'feathers' with a black marker.

Cut the peacock (look at the pictures) and paste it on a colored sheet.