Showing posts with label mixed media. Show all posts

Friday, October 27, 2023

Autumn birches


You need: 

  1. drawing sheets A3 size
  2. painters tape in several widths
  3. liquid watercolor paint in red, green and yellow in rood, geel en groen
  4. brushes
  5. tempera paint  
  6. stipple brush
  7. old shopping card/customer card
  8. saucers
  9. jars
Choose thick drawing paper,  to avoid ripping when you remove the tape . 

Look at birch trees. What do you see?   
 

  • straight trunks
  • trunks are white
  • horizontal peeling bark banden
  • autumn color leaves: orange, yellow, brown, red
What to do?

Step 1
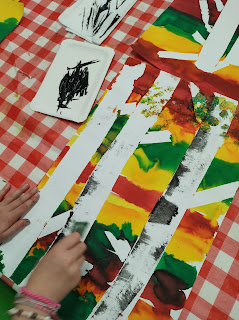
Palce the sheet on the table with the narrow site down.  Stick strips of tape from top to bottom. Wide for the trunks, narrower for the branches. Note: branches grow up and not down. 


Step 2
Paint the background in strips with diluted liquid watercolor. Let dry. Peel off the tape carefully. 

Step 3
Put some black tempera paint on a saucer. Dip your customer card in the paint. Pull this in several places from left to right (or right to left!) to halfway up the trunk to make the black streaks.

  
Step 4
Spray som warm colors tempera + green on a saucer.  Stipple leaves at the top of the trees using the stipple brush. Do not mix the colors, but use several colors at the brush at the same time.  


Step 5
Hang up! 


Artworks are made by students of grade 1. 

Tuesday, April 4, 2023

Starry Night like Vincent van Gogh


Show during both lessons hVan Gogh's painting Starry Night.  


Tell about Vincent van Gogh. Show Starry Night. Zoom in on the painting with Arts & Culture

The artwork students are going to make, will take two lessons.  

You need for the 1st lesson:
  1. black construction paper 
  2. aluminium foil
  3. piece of cardboard or a clay plate
  4. painter's tape
  5. tempera paint in blue and white 
  6. cotton swab
  7. brushes
  8. plate

Lesson 1
Wrap the cardboard/clay plate with aluminum foil and tape it on the back side. 

Step 1: For each pair of students there is a palette with blue and white paint. Students paint spiral shapes ons the aluminum foil with a brush and / or cotton swabs.


Stap 2: Make a print by placing a black sheet on top of your painting and pressing it.  

Stap 3: Remove the black sheet and let dry. 


 You need for the 2nd lesson:

  1. oilpastels in black, grey and purple
  2. tempera paint in yellow and white 
  3. black construction papier
  4. brushes
  5. scissors
  6. glue
  7. plate
Step 4: Draw and color the mountains with oilpastels. Draw the wavy movements in the air. The lines must run parallel to each other and also go in the same direction during a movement.
Show students that you can fade the colors by smearing the oil pastel. This way you can also make the colors darker or lighter.


Step 5: Determine where the large dark cypress should be and cut it out of black paper. (In grade 3 we gave students a shape to trace for the cypress.)


Step 6: Cut houses and glue them on tje painting. Draw lighted windows with oilpastels.  


Step 7: Paint moon and stars with tempera. 

Artworks are made by students of grade 3.

Elements of art: color, line, nuance, texture.


Monday, April 3, 2023

Water lilies on a plate


By a student of grade 1

Claude Monet (1840-1926) is considered one of the most important painters of Impressionism. 

 Typical for Impressionists:

  • they choose subjects from ordinary life 
  • special attention for light and color
  • work in the open air
  • smooth brushstrokes
  • dashes resemble a sketch
  • it's about the impression!

Monet had a large garden with a pond and a Japanese bridge in Giverny France. He liked to paint in that garden. His works of water lilies are therefore famous.

Discuss the term impressionism. Show some paintings by Monet and zoom in on a work with water lilies in Arts & Culture. Do students see the characteristics of impressionism in this artwork?

You need:
  1. paper plates
  2. tempera paint in blue and white 
  3. stencil brush
  4. white drawing sheet 
  5. tissue paper in green an light green 
  6. water and sponge
  7. tissue paper in pink and yellow
  8. mold of a water lily leaf
  9. glue
  10. scissors
Step 1:
Dab the plate with blue and white.  


Step 2:
Wet the white paper with a sponge. Cut squares from the green tissue paper. Place them on the wet paper and let the bleed. Let dry.


Step 3
Remove the tissue paper. Trace the mold of the lilyflower leaf and cut it out.  


Step 4
Fold the tissuepaper for the lily twice diagonally. Cut a flower shape. 


Step 5
Grab the flower shapes in the middle. Crumple them into a flower. Put a drop of glue on the lily leaf and stick the center of the lily on top. Roll a wad of leftover tissue paper and stick it in the center of the flower.

Elements of art: texture, color, space. 

Monday, May 9, 2022

Picture book illustration


Students of grade 6 made this illustration. After a good study of the original illustration in a Dutch picturebook, they made a list of required materials to use for this artwork. The faces and arms are painted, the clothes and curtains are cut out of fabric, the wallpaper comes from a sample book for wallpaper and the flags are from scraps of paper.


Monday, January 31, 2022

Son of Man - Like Magritte


You need:


  1. white drawings sheets A3 size

  2. white and blue tempera paint 

  3. paper with stone print

  4. white round paper

  5. camera

  6. bowler hat and black coat 

  7. brushes

  8. small dishes

  9. sponges


René Magritte

Rene Magritte is born in 1898 in Belgium. When Magritte is 13 years old, his mother commits suicide. She jumps in the river Samber and is found with her dress covering her face. This image has been suggested as the source of several paintings from Magritte: people hiding their faces with several objects.

In 1924 Magritte became friends with members of a surrealism group in Brussels: André Breton, Joan Miró and Salvador Dalí. These artists influence Magritte's work. In the end Magritte became famous with surrealistic paintings.

Magritte gave his paintings a realistic effect of surrealism. He painted simple objects, like a shoe, an apple, a pipe or a tree. Magritte took these things out of their ordinary environment and placed them in a special surrounding.

One of Magritte's most famous works is "La Trahison des Images" (The Treachery of Images). This is a very realistic painting from a pipe, with the text: Ceci n'est pas une pipe (This is not a pipe). The painting is not a pipe, but rather an image of a pipe. As Magritte himself commented: "The famous pipe. How people reproached me for it! And yet, could you stuff my pipe? No, it's just a representation, is it not? So if I had written on my picture 'This is a pipe,' I'd have been lying!"

By putting us constantly on the wrong track, Magritte forces us to think about art. Magritte thought it the task of an artist to place reality in a different context.


Look at the artwork

Discuss the painting The son of man. What do you see? What does the man wear? What's on his head? Why can he see little? Can he see nothing of can he peek at the edge of the apple? What's wrong with his left arm? (his arm appears to bend backwards at the elbow). What do you see at the background? What does the sky look like?


How do you make this artwork?

Take photographs of the students wearing a bowler hat and a dark coat; arms hanging beside the body. Students paint their sheet blue and let it dry. Cut a wall out of stoneprint paper and stick it on the blue sky. Stamp white spots on the artwork using a sponge. Let dry againg. Cut the photo neatly along the edges and paste it on the blue sheet in front of the stoneprint paper. Draw a piece of fruit on the circle sheet and show color transitions, just like real fruit. Paste it on the face.


Both artworks are made by students of grade 1