Showing posts with label trees. Show all posts

Friday, October 27, 2023

Autumn birches


You need: 

  1. drawing sheets A3 size
  2. painters tape in several widths
  3. liquid watercolor paint in red, green and yellow in rood, geel en groen
  4. brushes
  5. tempera paint  
  6. stipple brush
  7. old shopping card/customer card
  8. saucers
  9. jars
Choose thick drawing paper,  to avoid ripping when you remove the tape . 

Look at birch trees. What do you see?   
 

  • straight trunks
  • trunks are white
  • horizontal peeling bark banden
  • autumn color leaves: orange, yellow, brown, red
What to do?

Step 1
Palce the sheet on the table with the narrow site down.  Stick strips of tape from top to bottom. Wide for the trunks, narrower for the branches. Note: branches grow up and not down. 


Step 2
Paint the background in strips with diluted liquid watercolor. Let dry. Peel off the tape carefully. 

Step 3
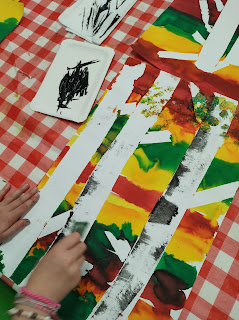
Put some black tempera paint on a saucer. Dip your customer card in the paint. Pull this in several places from left to right (or right to left!) to halfway up the trunk to make the black streaks.

  
Step 4
Spray som warm colors tempera + green on a saucer.  Stipple leaves at the top of the trees using the stipple brush. Do not mix the colors, but use several colors at the brush at the same time.  


Step 5
Hang up! 


Artworks are made by students of grade 1. 

Monday, November 21, 2022

Winter tree in warm-cool colors

 You need:

  1. drawing sheets 25 x 32,5 cm
  2. crayons
  3. watercolor paint
  4. black tempera 
  5. brushes
  6. jar with water
With crayon: draw a horizonline and a tree trunk from the bottom of the sheet. Draw branches that touch the edges of the sheet. Draw a pattern in the landscape below the horizon. 
With watercolor paint: paint the sky. Paint the surfaces between the branches in warm or cool colors. Paint the surfaces in the landscape: warm if you first chose cool, cool if you first chose warm. 
With tempera: paint the branches and trunk black. 

Elements of art: color (warm and cool), space, line (pattern)

artworks made by students of grade 4

Friday, December 3, 2021

Silver and white Xmas tree


Made by a student of grade 4


You need:


  1. green construction paper

  2. silver marker

  3. white pencil


Draw the trunk of a tree in the middle of a sheet, starting at the bottom and ending about 2 inches from the top. Color the trunk with silver marker. 


Draw lines from the trunk to the right and left. Don't use a ruler! The lines become shorter to create a triangle.  


Draw Xmas decorations on the branches using a white pencil. 

Thursday, December 2, 2021

Colourful Christmas trees


You need:


  1. two drawing sheets A4 size

  2. watercolour paint

  3. brushes

  4. jar with water

  5. tissue paper

  6. scissors

  7. glue

  8. ruler

  9. pencil

  10. gold or silver marker

  11. white correction marker

  12. glitter


Paint a background for the Christmas trees with water paint. Use different colours and let them blend into each other. Use plenty of water for nice bright colours.

Choose three colours of tissue paper. Fold the sheets several times and cut triangles and squares. Take a sheet of drawing paper and make it wet with a brush and water. Lay the pieces of tissue paper on this wet sheet. If the tissue paper is not wet enough, it won't bleed. Then make it wet again with a brush with water. Fill the sheet with these tissue paper parts and leave it to dry. Remove the pieces of tissue paper from the sheet when it is completely dry. The sheet will look like this:


Cut long triangles from the sheet that was coloured with tissue paper. You may use the schedule above (based on A4 size sheet of 21 by 29 cm - half cm will remain on both sides then). You can cut a piece from the bottom of the triangles if you want trees of various heights.

Paste these three trees with overlap on the water paint background. Don't paste the trees all at the same height, so you get depth. Cut some smaller triangles from the left overs if you want more trees.

Outline the trees with silver or gold marker. Draw a simple branch structure. Draw the strains with brown pencil or use the metallic pins. Draw snowflakes around and on the trees with a white (correction) marker or use chips from the punch. rond en op de bomen. Paste the artwork on a coloured background. Sprinkle some glitter on the forest floor.


All artwork is made by students of 11-12 years old

Sunday, November 14, 2021

Moon behind tree


Made by a student of grade 6

You need:


  1. white drawing sheet 

  2. charcoal

  3. chalk pastels 

  4. indian ink

  5. brush 


Use a saucer to draw a moon in the center of the sheet. Colour it with yellow chalk pastel. Colour the rest of the sheet grey using charcoal: around the moon it's brighter than further away.

Draw a branch and paint it with Indian ink.

Monday, September 13, 2021

Patterned trees collage


You need:


  1. white drawing sheet A3 size

  2. liquid water color paint

  3. brush

  4. construction paper in several colors

  5. scissors and glue

  6. black fine marker


Fold the sheet in two. Paint the upper half blue, the  lower half green. Leave the edges white. 


Cut several shapes from construction paper: ovals, 'clouds', circles.   


Use a fineliner to draw the trunk and fill the shapes with a variety of patterns.  


Paste the shapes on the painted sheet and be sure the shapes overlap each other to suggest depth.


Monday, December 14, 2020

Wooden Xmas trees


Made by students of grade 3


You need:


  1. wood

  2. coloured sheet

  3. Christmas decorations

  4. saw

  5. thumbtacks